Showing posts with label food. Show all posts

Fall is for Pumpkin

Thursday, September 19, 2013

It's no secret that fall is my favorite season. And, no, it's not because of Halloween (though I have been having fun at the shop making Halloween accessories). I love fall because the weather cools down, the leaves start to change into glowing shades of yellow, orange and red, and you can have pumpkin anything! I love pumpkin.

In this month's Food Network Magazine they provided an insert for '50 Things to make with Canned Pumpkin.' Yes, this is heaven. I've only tried one of the recipes so far (hubs isn't a huge pumpkin fan unless it's in the pie form) because it's hard to eat so much pumpkin by yourself without it going bad first. Here is Pumpkin Oatmeal! SOOO GOOD.

I apologize that this picture is awful. In my defense, oatmeal is really hard to photograph, and I hadn't even thought about the blog when I snapped this shot.
1 ½ milk
1 cup instant oats
½ cup canned pumpkin
*Simmer the above
2 tbsp brown sugar
1 tbsp butter
½ tsp pumpkin pie spice (I feel like you could put more than this if you wanted)
Pinch of salt
*Stir and let thicken

I threw some blueberries and banana in mine…YUM!

ENJOY!

Fish Tacos

Tuesday, August 20, 2013

A while back I decided to try my hand at fish tacos. They turned out great, are are husband approved! It's really simple, and a good option for a healthy, fast weeknight meal.


Ingredients:
Your favorite prepared fish fillets (I use the tortilla crusted tilapia from Costco)
Corn tortilla shells
Avocado


How To:
Prepare your coleslaw ingredients
I cook my fish in a hot skillet with EVOO
It's sort of a combo between sauteed and fried
The crust gets nice and crispy
Warm tortilla shells over burner on stove (monitor closely so not to burn)
Keep them wrapped in a cheese cloth towel until ready to serve
Mix all coleslaw ingredients
Slice avocado
Top two tortilla shells (so they don't tear) with fish, coleslaw and avocado


See, I told you this was easy! Literally, dinner is ready in about 30 minutes. You could add a side of rice, beans, chips and salsa, or any other side you like. Yum. I think this might be on our menu tomorrow!

Enjoy, friends!

Pizza Night

Tuesday, July 23, 2013

David and I are huge fans of an easy, order delivery, pizza night. Let's be honest, who isn't? In an effort to make something a bit healthier I decided to take delivery pizza night into my own hands. I am SO happy I did this. Here's the scoop.

I actually made one pizza, and one stromboli. Either way you can really get creative with your ingredients. I went basic with the pizza, and used spinach that I had already as my inspiration for the stromboli. To make this a do-able meal on a weeknight I started with the Pillsbury Classic Pizza Crust. If you're making a normal pizza you'll pre-bake it. If you choose to make a stromboli, no pre-baking needed. I just cooked it in 6-8 minute increments and kept a close eye on it.


Our pizza was pepperoni, green pepper and cheese. I went light on the cheese and heavier on the other toppings. Super easy to do. Pre-bake your crust on a cookie sheet. Add toppings of choice. Put back in the oven to cook and melt cheese. Your pizza will be ready in approximately 15 minutes total!


As mentioned, my stromboli inspiration came from some spinach that I already had at home. I picked up some mushroom alfredo sauce (I decided to make a white pizza), prosciutto (I was going to do bacon bits, but our market didn't have any, darn!), sun dried tomatoes, a red onion and garlic. You'll saute the onion and garlic in olive oil (probably 2-3 tbsp) to start. Once those are starting to cook down and soften you'll add your sun dried tomatoes, and prosciutto. I added my spinach when the prosciutto started to golden in color. Since the prosciutto is a salty meat, you don't need to add more salt. I seasoned with black pepper and red pepper flakes. Don't cook the spinach all the way down, I'd say about 2/3 of the way. It will finish in the oven. Now that your toppings are cooked, roll out your dough just as you would for a regular pizza. Pour your ingredients "long ways" across the dough in the middle. I topped it with a bit of shredded Italian cheese mixture (the same cheese that I used for our pizza), then wrapped the dough around the spinach mixture, pinched closed, and topped with a bit more cheese. Total, I think my stromboli cooked for about 20 minutes.


I'm sorry I don't have measurements. I guess I really am becoming a home cook. I just throw things together, and hope for the best! I promise though, if I can do this, you can do this. Happy cooking!

No Noodle Lasagna

Thursday, July 11, 2013

The baby has been bathed, fed, and is snug as a bug in bed. Dinner has been cooked - chicken caesar salads tonight - and I'm enjoying a little quiet time (with House Hunters) before the hubs gets home from work.

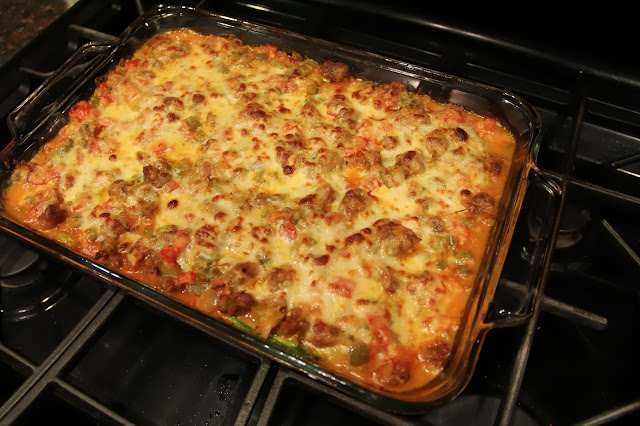
Tonight I have a delicious new recipe to share. Although the hubs hasn't tested it yet, I'm sure he'd approve. It's made with a common theme that we use often in our house...Italian sausage and peppers! (You can find my sausage and peppers pasta recipe here.) Many of you saw my Instagram picture yesterday of me cooking with Noelle. This is what I was working on.


It's definitely a bit more work than I usually like (especially on a weeknight) but is totally doable. Here's what you'll need:

1 lb hot Italian sausage ground (I use the links and remove them from their casings)
1 red pepper diced
1 green pepper diced
1/2 an onion diced
2 medium zucchini cut into wide thin strips (I just cut mine as thin as I could, but would probably use a mandolin slicer next time)
1 jar of vodka sauce
2 cups of Italian blend shredded cheese


Instructions:
1. Drain zucchini (some people prefer to salt it, and some bake it for a short time)*
2. Pre-heat oven to 350
3. Brown sausage and drain grease
4. Add chopped peppers and onion to the sausage until tender
5. Add 3/4 jar of vodka sauce and stir until well mixed
6. Put thin layer of sauce in the bottom of a 9 x 13 casserole dish
7. Add layer of zucchini strips
8. Add layer of sausage and peppers mixture
9. Top with 1 cup of cheese
10. Repeat steps 6-8
11. Put in oven for 30 minutes or until cheese is bubbly and starting to turn golden brown**
12. Remove from oven and let set for 10 minutes
13. Cut, serve and enjoy


*I did not drain my zucchini (forgot how much moisture it has) and it was a bit waterier than I would have preferred. However, it was perfectly fine reheated today for lunch.
**Mine didn't brown in the 30 minutes, but the cheese was totally melted so I put it under the broiler until it was golden brown.


So, like I said, it's more work than my usual weeknight recipes, but it's so easy and you can actually do most of the steps while other pieces are working (i.e. draining zucchini while you brown sausage while you chop veggies).

I really hope you like this one. It makes 12 servings, and if you're like us, is perfect for leftovers to take for lunch the next day. Bonus? Yup, there's a bonus with this one. It's only 200 calories/serving!! If you ask me, that's a hell of a deal for a delicious and filling dinner.

ENJOY!

Sausage and Peppers Pasta

Thursday, June 27, 2013

A combination that can't be beat.
One of our favorite meals, sausage and peppers, rolled into the most delicious pasta dish. 
This one is really easy too, guys. A perfect weeknight dinner!

You'll need:
(removed from the casings or start with the ground if they sell it at your grocer)
julienne cut red peppers, green peppers and onion
pasta of choice (this time I used fresh spinach fettuccine)
vodka sauce


How to:
get water on the stove and bring to a boil
brown sausage 
add onions until soft
add peppers until soft
add sauce (as little or much as you like)
boil pasta to al dente
 (if you buy fresh pasta it only takes a few minutes)
drain pasta and finish cooking in sauce


While pasta is typically not the first thing that comes to mind when it's 80 degrees outside, sometimes you just need a no brainer meal that's easy to throw together after a long day. It re-heats well, and is perfect to take to work for lunch, too!

Enjoy!

Chicken Caesar Salad

Friday, June 21, 2013

Summer is here, and it's time to start mixing some salads into our weeknight menu! We used to make big chicken salads with tons of delicious veggies all of the time, and somehow it has been missing for a while now. We menu planned last weekend, for the week, to ensure that we wouldn't let the lazieness take over after a long day of work, and order take-out.

We decided to make a chicken caesar salad, and it would be one of my nights to cook. What does this mean? Well, since I do not know how to grill, the chicken was getting cooked one of two ways: 1. in the oven, or 2. on the stove top. A few weeks ago we learned that our smoke detectors are quite sensitive, and since hubs wasn't home yet, stove top cooking was out of the question. I just couldn't risk them going off while I was trying to cook after Noelle went to sleep. I pulled out my trusty chicken tender recipe and got to cooking!


The salad was so delicious! The crispy chicken was an awesome compliment to the caesar salad. We'll definitely be making this more often. What are some of your favorite summer recipes?

Taco Pie

Tuesday, April 16, 2013

This weekend I tried out a new taco-ish recipe. You see, almost once a week Dave and I have some form of tacos. Whether it be our taco bowls or tostadas, we do enjoy our Mexican food.

Last week I was on Pillsbury's website looking for fun ways to cook with biscuits. I recently made a different recipe using biscuits as pie crust (our market doesn't sell pre-made pie crust, instead 12 kinds of phyllo dough), and felt inspired. I actually found quite a few recipes I'd like to try, but started with taco pie.


You can find the recipe here. A few alterations as usual. I don't have a pizza pan, so used a pie dish. I also couldn't find chopped green chiles, but Dave and I love chipotle in adobo, so I used a couple of those instead. I also added avocado to our toppings. I might pick up some sour cream next time too.

Anyway, it was delish! The hubs inhaled three slices, and I had one, plus a little extra myself.

Enjoy!

Peanut Butter Banana Oatmeal Bars

Monday, April 15, 2013

How was everyone's weekend? Ours was fantastic. A lazy day around the house on Saturday, and a few errands plus a trip to the dog park on Sunday!

Last week I saw a recipe on Pinterest for Healthy Peanut Butter Banana Oatmeal Bars. I bookmarked it and (unlike most things that I've pinned in the past) I actually made these this weekend! We had all of the ingredients too, so I didn't even need to make a trip to the grocery store.


These bars will be great for a quick snack, or could even work as a breakfast bar if you ate a couple (depending on how large you cut them). You can get the recipe here. Since we don't drink regular milk, I used almond milk, and I also used crunchy peanut butter instead of creamy. If you like a crispier bar I would cook them a bit longer, but after 23 minutes, ours were perfectly soft. Next time, I might even add chocolate chips. YUM!

This recipe has definitely landed a place in my personal cookbook! Enjoy!


Homemade Sweet Potato Puree

Sunday, April 7, 2013

Today was my first adventure in making baby food. I decided that I wasn't going to make any food until I knew what Noelle liked to eat, or didn't, so I wouldn't be wasting time or food. Now that peanut has tried a few different foods, we grabbed a sweet potato at the store and made our own puree!

I was given the Beaba Babycook as a gift at one of our baby showers. I've been excited to use it for a while now, and am so happy to have it. The Babycook is so easy to use, and I'll definitely be making more baby food in the coming months until Noelle eats more solids. I love that you can do everything in it - first steam, then blend.


ingredients: 
sweet potato
liquid reserved from steaming potato

how to:
cube sweet potato
steam in Babycook on number 3 setting
transfer steamed potatoes into blender
add reserved liquid to steamed potatoes until you reach the consistency your babe likes
store in silicone tray in freezer (each pod is a 4 oz serving) or in whatever tupperware you like
*I put some in the freezer and have portions in the fridge for this week
*Nono doesn't eat that much at once yet, so I stored 2 oz portions


The great thing about making this myself is that it's so cheap! Sweet potatoes at our market are $0.69/lb, and I made over two cups of sweet potato puree for baby girl. 


Thankfully, today, she still likes sweet potato!


Noelle's First Easter

Friday, April 5, 2013

I have been slacking majorly on the writing lately, but am trying to pick up the pace a bit. For whatever reason my blog motivation has been at an all time low. I have plenty to write about, but just haven't been able to drag myself to the computer and put my fingers to the keys. Anyways, whats important is that I'm here now.


Celebrating Noelle's first Easter was very low key. Over the course of the past few weeks she received Easter baskets from Nene and Da, as well as Cammy and TBD. Without knowing, both sets of Grandparents got Noelle singing and dancing "stuffed" (with a battery pack, not so snuggly) animals. Noelle is a bit young to really appreciate them now (as you'll see in the video with the bunny) but they'll be fun keepsakes to pull out for many Easters to come. They sure did act as good props though for our mini Easter photo shoot.


On Easter we went to the suburbs for a small Easter gathering with those of us left in Illinois. It was actually really nice just the six of us. Great Aunt Pam put together a little Easter basket hunt for Sophia and Noelle. Sophia lead the way, showing Noelle how it's done, and found their baskets outside. They're pals already!


Pam had a big spread including the traditional "pot-o-meat" and horseradish for brunch, and I provided dessert. This year I decided that, with our new family, I would start our own Easter tradition. Pistachio cake has always been a favorite in my family, so I decided that with it's light green color it would be the perfect Easter dessert. I promise, although it may sound strange, it is delicious. Here is the recipe.

cake ingredients:
1 yellow cake mix
1 package pistachio instant pudding
1 cup club soda
1 cup oil
3 eggs
1 cup walnuts, chopped

how to:
mix together (beat about 3 minutes)
grease 9X13 pan
bake at 350 degrees 40-45 minutes

frosting ingredients:
1 package pistachio instant pudding
1 cup milk

how to:
beat together
fold in 8 oz. cool whip (thawed)

*I recommend letting the cake cool in the fridge over night, though a few hours would probably be enough. It will then be ready for frosting, and you won't have to worry about it melting off the cake.

Enjoy!

Corned Beef and Cabbage

Thursday, April 4, 2013

Finally! As I mentioned in my OTG update, we made Corned Beef and Cabbage for St. Paddy's Day. It was easy and delicious.

ingredients:
3-4 lbs corned beef
4 carrots, cut into thirds 
2 onions, quartered
1 head of cabbage, quartered
*These amounts should be adjusted to what will actually fit in your slow cooker. I did not think of this, and everything almost did not fit. Lesson? I need a bigger slow cooker!

how to:
put your meat and the veggies (minus the cabbage) in your cooker
cook on low for 6 hours
remove corned beef and slice into smaller pieces to be served
return corned beef to cooker
add the cabbage
cook on low for another 2 hours


The corned beef I purchased had already been cured and spiced, so all I had to do was throw it in with the veggies. It was super easy, and we had plenty left over, too. Dave actually liked it better as left overs so it had even more time to marinate. 

Next time I make this I might add some red skin potatoes, but its definitely not necessary. And, I like to dip mine in a nice, grainy, horseradishy mustard. YUM! Serve it along side of your favorite porter or stout beer, and your good to go.

Enjoy!

Skillet Chicken Parmasean

Thursday, March 7, 2013

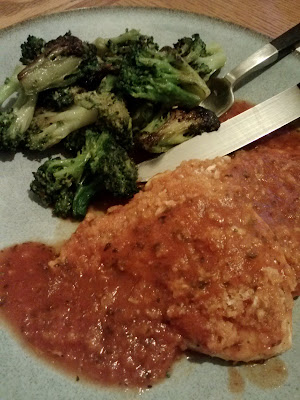
Continuing my quest to cook most of our meals during the week I found another recipe in my Food Network magazine that I will definitely be using in the future. This Skillet Chicken Parmesan is amazing.

It is very rare that I cook something and Dave and I think it's just right the first time. This one was a huge success, and I'll definitely be making it again soon. The sauce was simple and delicious. The chicken cooked perfectly in the cast iron skillet, and with a quick shot under the broiler we had a crispy melty top!

*apologies for the crummy cell phone pic!
I did make a couple changes to the recipe. I did not use baguette to make the breadcrumb topping. Instead I used panko breadcrumbs. This was much simpler. I just mixed some shredded parmesan (instead of mozzarella because I already had that in my fridge) with the panko before putting it under the broiler. Dave doesn't like so much cheese, so I only put it on half when it went into the oven.

If you're interested in how I prepared the broccoli, here's the run down.

Broccoli (trimmed into manageable pieces if you buy if fresh, we get ours frozen in portions from Costco) - enough for the family
Olive Oil - enough to coat your pan
Red pepper flakes - to taste
Garlic powder (you could probably use fresh if you prefer, 1 or 2 cloves smashed) - to taste
S & P

Sorry that my "recipe" doesn't really have exact measurements, but it's more about how you like it. If you don't like things so spicy go easy on (or eliminate) the red pepper. I saute my broccoli until it starts getting a bit brown (the color adds flavor, promise). This usually only takes about 15 to 20 minutes if your working from frozen (I throw it in the pan frozen), fresh will be much faster.

Ta-da! A 30-minute dinner is served!

Chicken Tenders

Sunday, March 3, 2013

Who doesn't love chicken tenders? Well, we love chicken, and in the tender form was definitely the way to go with this recipe.

I had this chicken for the first time while visiting my parents in Florida. My mom prepared it so quickly, and it was delicious, so I had to have the recipe. Come to find out, she got it out of the Food Network magazine that we both got subscriptions to from Grandma & Grandpa for Christmas. When I got home I pulled out that issue, and lo and behold, I had bookmarked the recipe!


I made some green beans (though definitely not enough), and roasted potatoes to go with it.

For the green beans, I sauteed them in olive oil, salt, pepper, and red pepper flakes. They almost took on a sort of fried texture in the approx. 3-4 tablespoons of olive oil. The seasonings are to your taste. When I cook veggies, I like them on the simpler side with very little seasoning so you can actually taste what you're eating.

My roasted potatoes can be one with any potato you prefer. These were a golden potato, but we often will use red skin potatoes, too. I cubed them, and coated them with olive oil before seasoning them with a rustic italian blend.

The potatoes went into the oven for about 30 minutes at 375 before putting the chicken in with it. When the chicken went in the oven, the temperature goes up to 450 (per Ted's recipe), and cooks for 15-20 minutes.

This was a really easy weeknight meal. We don't like to spend too much time cooking during the week, and I think this meal will definitely be added into our rotation.

Enjoy!


Taco Bowls

Saturday, January 26, 2013

Earlier this week I promised a post about a favorite weeknight meal. The first thing I will tell you is I'm sorry for the horribly low quality photo that is to come. It's just not in the cards lately, getting out the DSLR and setting a scene for my food shot when I barely have time to eat it.

Our nights with the babe are short and sweet on a weeknight. Dave and I both typically get home around 6 pm, the sitter leaves, the dog gets a walk, Noelle gets a bottle, and then it's bed time between 8-8:30 pm (for her, not us). In that two hours somewhere one of us makes dinner and we eat. 

Years ago Dave and I started making "Mexican Stirfry." It was one of our favorite dishes. Over the years though, it has transformed into more of a taco bowl. We love eating mexican food, and this is a super easy way to get that fix without all the work and assembly that tacos require.

You'll need ground beef, seasoned with taco seasoning, and your veggies of choice to mix in. This night, we chose a red pepper, a green pepper and half an onion that was leftover. We made a side of my favorite yellow rice (Zataran's is the best if you ask me) to go with it. I put my rice and taco mixture in a bowl together, and topped it with chunky avocado. 


In the old days where we had more time to linger over our meals, Dave would make his own pico de gallo, and guacamole. We would have other toppings such as salsa, sour cream, and melty Chihuahua cheese. If you like, I highly recommend these items! However, the sour cream and cheese definitely pack on the calories, so if you're looking for something with slightly less, don't cave into their deliciousness!

From start to finish, I'd say this takes about 35 minutes. Get your rice going first, and when it has about 15 minutes left, start your ground beef. After you've drained the fat out of your pan, add the taco seasoning. Once that is blended together throw in your veggies until they're soft. By the time this is done, your rice will be finished, and you're ready to chow down.

Enjoy!

Slow Cooking Returns

Tuesday, November 13, 2012

Well, it might not be on a Sunday, but the slow cooker, cooking, returned to our house this last week. It totally slipped my mind to even take photos while I was putting everything together, but it was delicious, so I wanted to share what I did with all of you.

The fall, and cooler temperatures always make me crave chili, and more hearty meals. I had two cans of shredded chicken (you know, like how tuna comes) in my cupboard and was trying to find a good use for them. In the summer I make a mean chicken salad, but it's certainly not the time of year for that, and chili is a pretty easy meal to throw together without any instruction. I'm usually not that adventurous, but I was confident that I couldn't screw this one up!

So, after deciding I was going to make a chicken chili, I had to run to the store to get the remaining ingredients. At the store I grabbed a can of red kidney beans, a can of corn, a can of stewed, sliced tomatoes, a packet of chili seasoning, and of course a box of Jiffy corn bread mix. The cans of chicken that I had on hand were large cans (from Costco) and I used two. (If you had the "normal" (tuna sized) cans, I'd probably use four cans.)

Everything can go into the slow cooker together. Drain the beans and corn, and use the juice from the tomatoes. I also added about 2/3 a bottle of beer. You can use whatever type of beer that you prefer. I used a brown ale since that's what we had at home. The chicken is already cooked, so it basically will just need to marinate together and warm. I had ours in the cooker for about 6 hours on low. Before we got ready to eat I whipped together the corn bread muffins so they would be warm with our meal. I also added a bit of flour to the chili to thicken it before we dug in. If you like a more soupy chili, don't add the flour, this is purely personal preference.

Next time I make this chili I'll be sure to take some photos and update the post.

In the mean time, now that Noelle and I are into a better routine, I should be able to find some time to write more. I wrote this last week, and am just now finishing it. We have a big milestone coming up though - Noelle's one month birthday!

Strawberry Pudding Parfait

Saturday, July 28, 2012

Two weeks ago when my mother-in-law was in town, she, Dave and I went to dinner, and shared a delicious strawberry shortcake. Well, this week I got a craving for that same dessert, but the hubs wasn't such a fan of the actual shortcake part. So, I decided to come up with something that he could enjoy too. 

I didn't use a recipe, or look around online, I just thought about how I could transform a dessert that I loved, into something that he would enjoy too. 

Here it is, my Strawberry Pudding Parfait!
strawberries cut into bite sized pieces, stir in sugar to taste
one box of vanilla instant pudding (chill before making parfait)
heavy whipping cream whipped into stiff peaks, blend in sugar to taste
layer in your serving dish

There could be some variation with this recipe. I've seen strawberries flavored with orange zest, and you could sweeten your whipped cream with vanilla, too. I decided to keep it more basic this time, but might mix it up the next time around.

Enjoy!

Banana Nutella Milkshake

Friday, May 4, 2012

Here I am on the megabus headed back to Michigan for what is surely to be an enjoyable weekend with the original four: mom, dad, sister, me - perfect. I'm taking this time to get caught up on some much needed blogging, and will start reading Outliers for our next book club meeting. I sure am happy that this bus has about 10 people on it, and I have a row to myself!

Last week I officially was in the second trimester - 14 weeks cooked! The biggest change? My long lost appetite was back in full force. I couldn't be happier :)

One night I had a craving for a milkshake, and to the kitchen I went. Vanilla ice cream and milk is a good place to start, but what did I want in my shake? I wasn't quite sure. Nutella and banana sound good to you? It surely sounded delicious to me!


1 cup vanilla ice cream
1 tbsp Nutella
1 banana
milk to the consistency you like


put all ingredients in blender
mix until smooth


Enjoy!

Shortbread Cookies

Tuesday, April 24, 2012

It's been a while since I've done some baking, and was rummaging through my cupboards the other day to see what I could pull together. With not much to go in the cookies, I decided on a basic shortbread cookie. I love a good shortbread cookie, and think I have found my favorite recipe.

Foodnetwork was my first stop, and I came across Ina Garten's recipe. I did not do the chocolate dipping, I'm more of a purist when it comes to shortbread. Otherwise though, follow this recipe and you'll be enjoying some shortbread in no time!


3/4 lb unsalted butter at room temperature
1 cup sugar, plus extra for sprinkling
1 tsp pure vanilla extract
3 1/2 cups all purpose flour
1/4 tsp salt


pre-heat oven to 350 degrees
mix butter and sugar in electric mixer until combined ~ add vanilla
sift flour and salt together in medium bowl ~ add to butter/sugar/vanilla mixture until dough forms
on a dusted surface form dough into disc ~ wrap in plastic & refrigerate for 30 minutes
roll dough out to 1/2 inch thick ~ cut into your favorite shape with cookie cutters
place cookies onto ungreased cookie sheet and sprinkle with sugar
bake for 20-25 minutes until edges begin to brown
let cookies cool

ENJOY!